Soil Care /Mulching
Revitalize Your Landscape: Discover the Hidden Benefits of Soil Aeration
Compacted soil can kill healthy trees. That’s right. Compacted soil can kill trees. It’s a silent killer. It might seem harmless if you see it, but this dense, suffocating environment deprives roots of three vital resources they need to thrive—oxygen, water, and nutrients. So, you need to address this problem as soon as you see it.
Compact soil is a common issue in urban and suburban landscapes. When soil becomes compacted, it harms the very foundation of a tree’s health. Soil aeration, a crucial practice for enhancing root health and boosting a tree’s longevity and vitality, can address this widespread problem.
Healthy soil features a balance of minerals, organic matter, water, and air. This porous structure allows for proper gas exchange, letting oxygen reach the roots and carbon dioxide escape. It also ensures that water can infiltrate the soil and be absorbed by tree roots instead of running off the surface.

Compaction transforms this process. It squeezes the air pockets and pore spaces needed for root function, leading to several harmful effects, including oxygen deprivation, nutrient and water shortages, and limited root growth. The Fall is a good time to aerate your soil. It promotes root growth and prepares a tree better for winter.
Aerating in the Fall is Optimal
Fall aeration coincides with the tree’s natural growth cycles, allowing it to recover and benefit most from the process. Like those found in Rhode Island, Fall is often considered the optimal time for cool-season grasses.
Here’s a more detailed breakdown of why Fall is ideal for aerating:
- Promotes Root Growth: In the Fall, a tree’s energy shifts from producing leaves to developing its root system in preparation for winter. Aerating the soil like this lets roots grow into the newly created channels, creating a strong, resilient foundation.
- Ideal Conditions: The cooler air temperatures and increased rainfall in the Fall reduce a tree’s stress and help the soil remain moist, essential for effective aeration. It’s much easier to work with moist but not waterlogged soil.
- Winter Preparation: Fall aerating helps trees withstand winter’s freeze-thaw cycles by improving drainage and preventing water from pooling and freezing around the roots.
If you have heavy clay soil that tends to compact, you might need to aerate more often, perhaps once a year. For significant compaction or large, mature trees, consult a certified arborist or the experts at RI Tree.
Three Effective Methods for Aerating Soil
Aeration creates small holes or channels in the soil to mitigate compaction, restore the proper balance of air and water, and deliver nutrients. Several ways exist to achieve this aeration. They each have their own benefits.
1. Core Aeration
This method is a highly effective and widely used. A specialized machine or tool removes small plugs or “cores” of soil from the ground. The benefits of core aeration are profound:
- Breaks up compaction: By removing soil, core aeration immediately creates channels that allow oxygen, water, and nutrients to penetrate deep into the root zone.
- Improves gas exchange: The newly created air pockets facilitate the movement of gases, allowing roots to breathe and for harmful gases like carbon dioxide to escape.
- Enhances water infiltration: Rain and irrigation water can move through the soil profile instead of just running off, ensuring that water reaches the roots where it is needed most.
- Encourages deeper root growth: With the physical barrier removed, roots can extend further down into the soil, creating a stronger, more resilient root system that is less susceptible to drought.
Soil plugs left on the surface can decompose, returning valuable organic matter and nutrients to the soil.
2. Radial Trenching
Arborists use radial trenching for more severe cases of compaction or larger trees. First, you dig narrow trenches outward from the tree trunk, like spokes on a wheel. You then fill the trenches with a mixture of compost and loamy soil.
- Direct access: Trenching provides a direct conduit for air and water to reach the roots, and the organic-rich soil mixture encourages new root growth within the trenches.
- Addresses deeper compaction: Radial trenching can address compaction at greater depths than core aeration, making it ideal for severely distressed trees.
3. Vertical Mulching (VM)
Like radial trenching, VM involves drilling holes around the tree’s compacted soil in a grid pattern. The holes are then filled with compost, sand, and other organic matter. This method
- combines aeration and fertilization: It aerates the soil and directly delivers essential nutrients and organic matter to the root zone, improving soil structure.
- Less intrusive: Vertical mulching can be less disruptive than radial trenching, making it suitable for areas where root damage needs to be minimized.
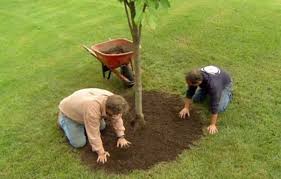
Apply a layer of organic mulch over the treated area after aeration. This method helps retain moisture, regulate soil temperature, and slowly add organic matter to the soil, supporting long-term health.
For a more comprehensive approach, contact a certified arborist or one of our experts at RI Tree. They can assess the tree’s needs and recommend a combination of aeration, fertilization, and other treatments needed in your situation.
Boost Tree Health Now: Six Proven Strategies to Beat Drought Stress
July was hot, with the average daily high around 84°F (29°C). Several days in July reached the 90s or higher, with some even hitting 100. Rainfall averaged 5 inches, which can keep most soil moist, but still not enough for plants to survive and thrive. If this month is anything like August in other years, it could be just as hot as July, if not hotter.
History indicates that August tends to be at least several degrees hotter in Rhode Island than July. This month often records the highest summer temperatures of the year. By mid-month, plants could begin to show early signs of drought stress, which can negatively impact their growth and development. Combating drought stress can be a challenge.
Drought Stress Symptoms
Drought stress symptoms in plants include cupped and curled leaf edges, wilting of foliage, and new shoots less than a year old. Other signs are yellowing or browning leaves and early dropping of leaves or fruit. Drought-stressed plants may also show stunted growth and overall lack of vigor.
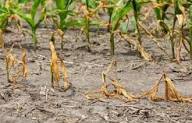
Drought stress also weakens a plant’s defense systems, making it vulnerable to secondary problems like Gypsy moths, root rot, and canker fungi. These “secondary invaders” are often the final cause of death for a distressed tree or plant. As a result, trees and shrubs may need extra watering to protect them from damage.
Challenges to Plants from Drought Stress
Drought stress poses significant challenges for tree care, impacting tree health and increasing susceptibility to other issues:
• Pests during this time include Bark Beetles, which are one of the most well-known groups of pests that capitalize on drought-stressed trees, especially conifers like pine, spruce, and fir. Weakened trees can’t produce enough resin to “pitch out” the beetles, allowing them to tunnel under the bark. Other pests to watch out for include Ambrosia beetles, scale insects and mites, and gypsy moth. (Spongy moth).
• Diseases to watch for include canker fungi, which appear sunken and dead areas on tree bark. Many fungi that cause cankers, such as Cytospora and Nectria, need a stressed host to infect successfully. Drought-induced bark cracking can also let these fungi enter. Also, watch for root rot, which can damage a tree’s root system and make it more vulnerable to various pathogens and vascular wilts, which can block a tree’s water transport system.
Six Steps to Battling Drought Stress
As a caretaker of trees, your role in combating drought stress is crucial for their long-term health and survival. Here are six critical steps you can take to make a significant difference:
- Water deeply and infrequently: Trees are remarkably resilient. By providing a slow, thorough soak of the entire root zone, you encourage this resilience and enhance their long-term survival. Aim for about one inch of water per week from rain or irrigation. Remember, watering deeply once a week is better than giving shallow, frequent watering.
- Mulch for moisture retention: Apply a 2-4 inch layer of organic mulch, such as wood chips or shredded bark, around the tree’s base. Mulching helps the soil retain moisture, reduces evaporation, and suppresses competing weeds and grass. Keep the mulch a few inches from the tree’s trunk to prevent rot and pest issues.
- Prioritize trees: Focus on watering your most valuable or vulnerable trees. This step includes newly planted trees (within their first 3-5 years) and mature trees that provide significant shade and are expensive to replace. Brown lawns will recover; dead trees won’t.
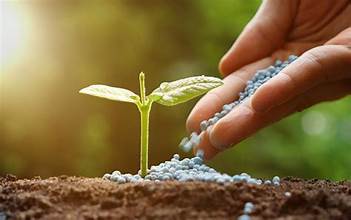
- Avoid fertilizing: During a drought, a tree’s energy should focus on survival not growth. Applying fertilizer can stimulate new growth, which requires more water and can increase the tree’s stress. Wait to fertilize until the drought ends and the tree has recovered.
- Stop pruning (except for deadwood): Avoid unnecessary pruning of live branches, as this creates wounds that require healing energy. This energy should be conserved during a drought to help the tree cope with stress and survive. Only prune to remove dead, damaged, or diseased branches, as they can harbor pests and diseases.
- Eliminate competition: Remove turfgrass and weeds from beneath the tree’s canopy. Grass and weeds directly compete with the tree for water and nutrients. Replacing this area with a layer of mulch is an effective way to support the tree.
Recently Installed Trees
Recently planted plants (up to 3 years after planting) require at least 10 gallons of water per week, which should be doubled for established plants. Additionally, to reduce water evaporation, irrigate either early in the morning or at dusk when the temperature is below the daily high.
Finally, trees and shrubs are nearing the end of their annual growth cycle. The last stage of this cycle involves developing the buds for next year (both vegetative and flowering). By the end of August, these new buds should be visible in the leaf axils, where the leaf attaches to the stem.
Be vigilant and watch for plant drought symptoms that appear when daily temperatures rise above 85°F for 3-4 days in a row or dry conditions persist for more than 10 days.
Need help combating drought stress? Contact RI Tree by phone (401) 764-5885 or email. Our experts can provide proven strategies to help your plants survive and thrive.
Soil Testing: A Practical Guide to Ensure Your Trees Thrive
Soil testing, a crucial step before tree planting, offers many benefits. It pinpoints nutrient deficiencies, reduces resource wastage, and reveals your soil’s pH level and nutrient needs, among other things. This knowledge is key to ensuring your tree or trees thrive. The optimal time for soil testing is a few weeks before planting.

You can test the soil with a home testing kit, readily available at garden centers and big box stores. Or, you can go to a soil testing lab like the University of Rhode Island’s Cooperative Extension. You can also go to private companies that offer soil testing services.
Tips on Soil Testing Yourself
Below is a step-by-step breakdown of how to test your soil:
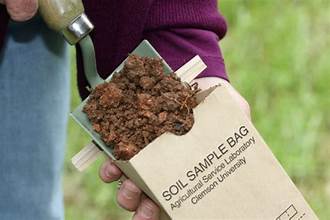
- Gather your tools—You’ll need a clean trowel or spade, a bucket, and a permanent marker. Wear gloves for ease of handling soil, and use a stainless steel or chrome-plated soil probe. Brass, bronze, or galvanized tools can contaminate samples with copper or zinc.
- Choose the testing method—Decide whether you’ll use a home test kit (faster but less accurate) or send a sample to a lab (more precise but takes longer).
- Target planting area—Collect samples from where you plan to plant your tree.
- Sample depth—Aim for 6-12 inches deep, where tree roots will establish. (If you’re testing soil for lawns, go 3 inches down.)
- Multiple samples—Take 10-15 samples in a zig-zag pattern to get a good representation of the area. Avoid areas with obvious signs of contamination or recent fertilization.
- Mix it up—In your clean bucket, combine all the collected soil samples and mix them thoroughly. Remove any large rocks or other non-soil particles from the soil.
- Sample amount—Depending on your chosen testing method, take the recommended amount of the composite sample (usually 1-2 cups) for testing. Label the container with your name, collection date, and intended planting area.
Soil testing is a valuable tool that can help ensure your tree’s success. If you’re unsure about the process contact RI Tree. Our experts can provide the guidance and support you need to test your soil successfully.
Discover the Power of Soil Testing: A Practical Guide to Ensure Your Trees Thrive
Testing your soil is a critical step before planting a tree. Testing your soil identifies nutrient deficiencies. Knowing what nutrients your soil lacks helps you choose the right fertilizer to give your tree a healthy start. You also test the soil to check its pH level. Most trees prefer slightly acidic to neutral soil (pH 6-7). If the pH is too high (alkaline) or too low (acidic), it can prevent trees from absorbing nutrients.
A third reason to test your soil is to avoid wasting resources. By understanding your soil’s baseline, you can avoid applying unnecessary fertilizers or amendments. Testing helps you target exactly what your soil needs, avoiding over-application and potential environmental harm from fertilizer runoff. For fruit trees, proper soil nutrients impact the quantity and quality of fruit produced, and a soil test can help you optimize your soil for a bountiful harvest.
Best Time to Test Your Soil
The best time to test your soil is a few weeks before planting. That allows you time to amend the soil if needed, based on the test results. You can test the soil yourself using a home testing kit, which is readily available at garden centers and big box stores. This method will give you a basic analysis of pH and nutrient levels. Convenience is a key benefit of testing the soil yourself. Self-testing also creates a good entry point for those new gardeners to learn more about soil and plant needs.
For a more precise analysis, consider sending your sample to a professional soil testing lab. Local extension offices can often provide recommendations on labs. In Rhode Island, you can test your soil at the University of Rhode Island’s Cooperative Extension, College of the Environmental and Life Sciences. Below is more information on how to do that. (If you’re not from Rhode Island, you can find a state-by-state list of soil testing labs on this website.)
Several private companies offer soil testing services. These labs may offer a wider range of tests or faster turnaround times than university labs.
Here are a couple examples:
• New England Testing Laboratory (https://www.newenglandtesting.com/Privacy.php) in West Warwick, RI.
• New England Specialty Soils Screening Facility (https://www.nesoils.com/) in Lancaster, MA.
Consider factors like the type of test you need, turnaround time, and cost when choosing a testing service.
Soil Testing in Rhode Island
The URI lab offers many free and low-cost informational and diagnostic services to Rhode Island citizens. Its Master Gardeners conduct free soil pH testing for the residents of Rhode Island and surrounding areas from March through October. These tests will help determine soil pH levels and predominant soil texture. It also provides basic information and recommendations for the gradual correction of soil pH and compaction issues.
You have two ways to get your soil tested with this program. You can attend a community event where URI’s Gardening Information and Soil Testing booth will be. See the 2024 schedule here. Or, you can mail-in your sample with a Soil Test Result Report Form. Print the form, complete it, and send it along with your sample to URI Cooperative Extension, 3 East Alumni Ave, Kingston, RI 02881. Please include ‘Attn: Soil Test’ on the envelope.
Here’s a step-by-step breakdown of what’s involved in testing your soil for planting trees. Keep in mind that preparation is critical to getting a good sample for testing:
- Gather your tools—You’ll need a clean trowel or spade, a bucket, and a permanent marker. Consider wearing gloves for ease of handling soil. Use a stainless steel or chrome-plated soil probe. Brass, bronze, or galvanized tools can contaminate samples with copper and/or zinc.
- Choose the testing method—Decide whether you’ll use a home test kit (faster but less accurate) or send a sample to a lab (more precise but takes longer).
- Target planting area—Collect samples from the area where you plan to plant your tree.
- Sample depth—Aim for 6-12 inches deep, where tree roots will establish. (If you’re testing soil for lawns, go 3 inches down.)
- Multiple samples—Take 10-15 samples in a zig-zag pattern to get a good representation of the area. Avoid areas with obvious signs of contamination or recent fertilization.
- Mix it up—In your clean bucket, combine all the collected soil samples and mix them thoroughly. Remove any large rocks or other non-soil particles from the soil.
- Sample amount—Depending on your chosen testing method, take the recommended amount of the composite sample (usually 1-2 cups) for testing. Label the container with your name, collection date, and intended planting area.
Additional Tips:
• A soil probe or auger is the best tool for sampling, especially if the soil is very stony or gravel.
• If a soil probe or auger is not available, use a garden trowel, shovel, or spade to dig into the desired depth of the soil depth.
• Cut out a triangular wedge of soil. Then, set it aside (to be replaced after sampling). Slide your blade into the soil again, taking a thin (half-inch) slice from one side of the hole.
• Store your labeled soil sample in a cool, dry place until testing.
• Some labs offer online tools to help interpret your soil test results and recommend amendments if you’re using the self-test approach.
• If you’re submitting your sample to a soil testing lab, you’ll need a soil sample information sheet and a soil sample box. Both are available from the extension office in your county or city.
By following these steps, you can gain valuable insights into your soil’s condition and ensure your new tree has the best chance of thriving. All the tools mentioned in this article are available online. If you need help taking a soil sample, contact RI Tree. Our experts can guide your through the process.
Aerating the Soil around Your Trees Boosts Tree Health and Growth
Water is an obvious plant requirement, but so is oxygen. A tree uses oxygen below ground and above to boost its health and growth. The tree’s vascular systems can’t properly function without soil oxygen, and its roots can‘t absorb water. Plus, there are microbes and organisms underground that can help enhance a tree’s survival but need oxygen to do it. That’s where aeration helps.
Aerating around your trees helps them “breathe” fresh air. It boosts tree health and growth dramatically. Here are some additional benefits of aerating your soil:
- Improves oxygen flow
- Enhances water flow
- Increases nutrient absorption
- Strengthens root growth
- Increases tree health
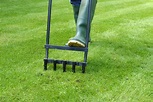
Spike aeration is the easiest way for home gardeners to aerate soil themselves. Grab a spiky tool, like a hand cultivator, metal rake, or pitchfork, and puncture the soil in a broad area around your tree. This effort makes the soil more porous so that oxygen can access the roots and water can drain more readily through the soil. Be careful not to stab surface roots with your tool!
Aerate around your trees once or twice a year, in the Spring and/or fall, and always follow up with mulch (You can find a great video on the website how to properly mulch). For mature trees starting to show their age, it’s best to aerate the soil, mulch a large area around the base, and then walk over the roots as little as possible. Mature trees tend to be even more vulnerable to soil compaction.
Lastly – be aware that a healthy-looking tree does not indicate your soil is fine! The negative impacts of soil compaction might not become visible in the canopy for several growing seasons. So be proactive and build aeration into your annual tree care routine.
Want more tips about keeping your trees healthy or planning to install new woody plants? Check out RI Tree Council’s other articles on tree care page or sign up for the next Tree Stewards course. Go to RITree.org for more information.
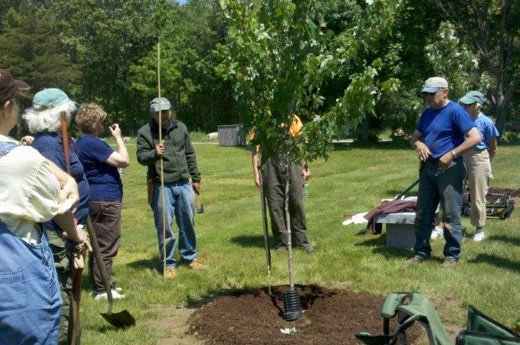
Matching the Right Tree to the Right Soil Helps Build Strong, Healthy Trees
Matching the right tree to the right soil is critical. It builds strong, healthy trees by delivering the right nutrients and drainage to the plant—all while boosting disease resistance, reducing maintenance, and promoting a nurturing ecosystem. A mature, healthy tree adds anywhere from 3 to 15 percent to your home’s value, which is an added benefit
But matching the right tree to the right soil is dicey. So, you need to get it right for the best results. Here are some challenges when matching trees to soil:
- Determining soil type and tree needs
- Generating an accurate soil assessment
- Researching information about specific trees
- Modifying existing soil correctly
- Monitoring to ensure a tree’s continued health
By understanding and overcoming these challenges, you can boost your chances of making a successful tree-soil match that nurtures a thriving, healthy plant for years to come. Consulting technicians at the Rhode Island Tree Council can help you beat the challenges described above.
Also, the University of Rhode Island’s Soil Testing service is free through its Master Gardner program. You provide the school’s lab with a sample of your soil. It will test its pH (acidity/alkalinity), evaluate its texture and content, and recommend what actions to take to improve your soil’s pH and health.
Meanwhile, the booklet “Soils of Rhode Island Landscapes” by William R. Wright and Edward Sautter provides more information on this topic. Its goal is to arouse public interest in soils and make people aware of this valuable natural resource.
Selecting the Right Tree for Your Soil Spurs Plant Growth, Health and Maintenance
Matching the right tree to the right soil provides numerous benefits. Matching grows strong, healthy trees by delivering nutrients, drainage, and aeration to the plant, boosting disease resistance, and reducing maintenance needs—all while promoting a harmonious, nurturing ecosystem. Plus, it increases your property’s value. A mature, healthy tree adds anywhere from 3 to 15 percent to your home’s value.
But matching the right tree to the right soil is dicey. So, you need to get it right for the best results. Choosing the wrong soil, on the other hand, stunts a tree’s growth, deprives it of essential nutrients, leaves it susceptible to diseases, and even causes death.

Specific challenges to choosing the suitable soil include:
- Diverse soil types and tree needs
- Generating an accurate assessment
- Limited information about specific trees
- Modifying existing soil
- Monitoring to ensure trees continue health
By understanding these challenges and then overcoming them, you can boost your chances of making a successful tree-soil match that nurtures a thriving, healthy tree for years to come. Consulting technicians at the Rhode Island Tree Council can help as well beat the challenges described above.
Two Critical Steps to Tree-Soil Matching
There are two critical steps to match a tree to the soil. The first is understanding your soil. Start by consulting the USDA’s Plant Hardiness Zone Map, which is divided into 12 zones. Each zone reflects the area’s average minimum temperatures during the winter in that area. Zone 1 is the coldest, while Zone 12 is the warmest. A powerful tool for growers, the map tells you which trees thrive in your climate.
While most of Rhode Island falls within the plant hardiness of Zone 6a, the state’s complete hardiness zone extends from 5b to 7a. This area averages annual minimum temperatures ranging from -10°F to 5°F. The results reflect the state’s coastal location with its northern and western regions being cooler than its southern and eastern areas. Our blog post on the Plant Hardiness map tells you how to use the map to the best advantage.
Test Soil to Determine Key Factors
The second step in the matching process is testing your soil. This step reveals your soil’s pH, nutrient levels, and drainage—all critical factors for tree growth. Home improvement stores, like Home Depot or Lowes, often sell test kits for this purpose so you can test the soil yourself. Or, you can mail soil samples to a professional lab for a more detailed analysis.
The University of Rhode Island’s Soil Testing service, for example, is free through its Master Gardner program. You provide the school’s lab with a sample of your soil. It will test its pH (acidity/alkalinity), evaluate its texture and content, and recommend what actions to take to improve your soil’s pH and health.
The booklet “Soils of Rhode Island Landscapes” by William R. Wright and Edward Sautter provides more information on Rhode Island soils. The booklet’s goal is to arouse public interest in soils and make people aware of this valuable natural resource. As the name implies, this 62-page booklet provides an in-depth look at Rhode Island soils.
Research on Tree-Soil Compatibility
Studies by scientists offer valuable insights into the relationship between trees and soil. One five-year study by the Morton Arboretum in Lisle, IL, for example, targets the impact of organic and inorganic fertilizers on soil quality and tree growth. That study shows that soil compost and mulch have a significant impact on soil quality, but the benefits take three years to kick in.
Here are some additional findings tree-soil compatibility research provides:
- Some tree species prefer specific soil characteristics like drainage, pH, nutrient content, and texture. For example, oaks thrive in well-drained sandy soils, while maples prefer slightly acidic soils with good moisture retention.
- Certain trees have deep root systems that can access water and nutrients from lower soil layers, while others have shallow roots that rely on surface moisture. Matching root systems to suitable soil depths boosts water and nutrient uptake.
- Adding organic matter like compost can improve drainage and nutrient availability in clay soils, but adding sulfur can adjust the pH for more acid-loving trees. But you need to consider these actions’ long-term impacts and cost-effectiveness.
- Rainfall patterns, temperature fluctuations, and local topography can affect soil moisture and nutrient cycling. That, in turn, impacts tree suitability. Matching trees to local conditions and a site’s microclimates boost plant health.
- Long-term monitoring after planting trees in new soil proves significant. Monitoring growth, survival rates, and potential disease or nutrient deficiencies helps assess the success of the tree-soil match and identify any necessary adjustments.
Understanding these research findings on tree-soil compatibility is beneficial. It helps you make informed planting decisions about what trees to plant in which soil environments. That, in turn, promotes the tree’s health and longevity. Plus, it contributes to healthy ecosystems, among other things. Put simply, making the best tree soil match possible is a win-win for you and the tree you plant.
Winter Time Mulching; How to Mulch Your Trees and Shrubs to Boost Plant Health & Hardiness
Do you “mulch” your trees and shrubs regularly? Mulching is a tree care activity we often overlook. But it’s more important than many people think. It delivers vital benefits to trees and shrubs that go way beyond making your yard look nice. Put simply, Mulching boosts a plant’s health and hardiness.
So when should you mulch your trees and shrubs? That depends on your goals and the climate in your area. Each season has its pros and cons. The key is knowing when the best time to mulch is for you. Springtime mulching, for example, stimulates root growth but may require re-mulching later on in the season.
Wintertime mulching, on the other hand, insulates roots from sudden cold snaps but can trap frost and damage roots in freezing temperatures. Ultimately, you want to mulch when it’s most beneficial to your trees and shrubs. Soil temperature, rainfall patterns, and tree health are all factors when deciding when to mulch.
Benefits of Mulching
Mulching reduces water evaporation by 30-70%, increases water filtration 3 to 5 times, and lowers soil temperature by as much as 10° F. It also reduces weed pressure by 50-90%, boosts tree growth by 20-50, and deters pests from attacking trees and shrubs. If you use organic materials, it adds vital nutrients to the soil when the material breaks down, enriching the soil and boosting plant growth.
Mulching also:
- Prevents soil compaction from foot traffic and lawnmowers
- Promotes better root penetration and aeration
- Prevents soil erosion from wind and rain
- Protects a tree or a shrub’s base
- Reduces the need to mow or weed around your trees
- Saves maintenance time, cost, and effort.
These benefits can make a difference to your trees and shrubs—no doubt about it. But you need to choose the right mulch to enjoy those benefits. Organic mulch, such as wood chips, tree bark, and shredded leaves, offers advantages inorganic mulch doesn’t offer as discussed above. Inorganic mulch, such as gravel, rubber mulch, and fabric, can suppress weeds effectively but doesn’t deliver organic mulch’s nutrient benefits.
Tips on Mulching
There’s more to mulching than many people think. Here are some tips on how to mulch effectively:
- Mulch when it’s best for your trees and shrubs. Early spring (after the last frost) or late fall are generally ideal because soil temperatures are mild. Avoid mulching when it’s hot and dry, or the ground is frozen.
- Start by removing any weeds or debris around the plant’s base, then identify your drip line—the outermost edge of the plant’s canopy. Spread the mulch to at least this edge but at least three to five feet from the trunk.
- Apply a 2 to 3-inch layer of organic mulch for mature trees and a 1 to 2-inch layer for young and new trees. Leave a gap between 2 to 3 inches from the tree trunk or shrub base. Avoid applying mulch too high. It can choke the choke the roots.
- Create a clean border around the mulch using either bricks, stone, or other edging material, which prevents the mulch from spreading and helps maintain a nice appearance.
- Replenish the mulch layer as it decomposes, or the wind blows it away. The mulch won’t suppress all your weeds, so you may still have to pull some from the ground. Pull them gently to avoid disturbing the mulch. it
- Check the soil under the mulch during dry periods. If it feels dry, water it deeply. You want to make sure the water gets to all the roots.
Apply these tips to mulch in a way that’s designed to boost your tree’s and shrub’s health and hardiness. Also, be mindful of nearby structures and walkways when mulching. It can attract pests.
Also, consider using different types of mulch for different areas of your yard. And don’t use fresh or dyed wood chips. They can release harmful chemicals. Mulching regularly can help your trees and shrubs thrive for years to come.
Six Tips on Mulching Trees
Mulching benefits trees and shrubs. It reduces water evaporation, prevents soil compaction, and boosts root penetration and aeration. It also prevents soil erosion from wind and rain, reduces pressure from weeds, and enriches the soil. In short, mulching promotes plant growth and hardiness when done correctly. But there’s more to mulching than many people think.
Here are six tips on how to mulch your trees and shrubs:
- Mulch when it’s best for your trees and shrubs. Early spring (after the last frost) or late fall are generally ideal because soil temperatures are mild.
- Remove any weeds or debris around the plant’s base, and identify your drip line then. spread the mulch to at least this edge but at least three to five feet from the trunk.
- Apply a 2 to 3-inch layer of organic mulch for mature trees and a 1 to 2-inch layer for young and new trees. Leave a gap between 2 to 3 inches from the tree trunk or shrub base.
- Create a clean border around the mulch using either bricks, stone, or other edging material, which prevents the mulch from spreading and helps maintain a nice appearance.
- Replenish the mulch as it decomposes. The mulch won’t suppress all your weeds, so you may still have to pull some from the ground. Pull them gently to avoid disturbing the mulch. it
- Check the soil under the mulch during dry periods. If it feels dry, water it deeply. You want to make sure the water gets to all the roots.
Apply these tips to mulch in a way that’s designed to boost your tree’s and shrub’s health and hardiness. For more help with mulching, contact RI Tree .
Why Aerate your Soil? Some Easy Tips and Tricks for Healthier Trees
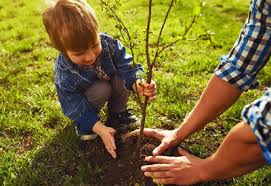
Take a second to picture a tree that you love – maybe it’s the big oak in your backyard, the street tree in front of your house, or the new ornamental tree that you just planted in your garden. You probably will do (a number of things²) several things to care for your tree – water it while it’s young or during a period of drought, mulch it in the springtime, or get it professionally pruned as it matures.
You might also do some things to mitigate harm to the above-ground portions of the tree, like ask a builder not to hit the trunk or branches during a home renovation project. However, we generally don’t consider the potentially harmful effects of our every-day behavior on the health of our beloved trees, and consequently, fail to implement a few simple, but high-impact solutions.
Interacting with Our Trees
Let’s take those three hypothetical trees mentioned above. Maybe you picnic around that big oak in your backyard or dash underneath the canopy when it starts to rain. Maybe you walk across the sidewalk tree well in which your street tree is planted, while being careful not to hit the trunk as you open your car door. Maybe you water your ornamental tree, and then walk about the garden pulling weeds and tending to other plants.
These are all wonderful ways to interact with the trees at home or in our communities but walking repeatedly across the soil that’s covering tree roots (particularly when the soil is wet) is not one of them³. This causes the soil to compact, squeezing out of it the water and oxygen essential for healthy plant growth.
Water is an obvious plant requirement, but oxygen is just as necessary below ground as it is above. Without soil oxygen, the tree’s vascular systems cannot properly function and roots are unable to absorb water. There also are microbes and organisms underground that are beneficial to tree survival and need oxygen as well.
Spike Aeration Boosts Tree Health
Here at RI Tree Council, we (definitely) don’t want you to stop picnicking under your tree or wandering around your garden – and the good news is, you don’t have to! Here are some tips (and tricks) to perform soil aeration (the practice of loosening soil to create pathways between soil particles) so that you can keep your beloved trees healthy for years to come.
Spike aeration is the easiest way for home gardeners to aerate their soil on their own! Grab a spikey tool, like a hand cultivator, metal rake, or pitchfork and puncture the soil in a broad area all around your tree. This will allow it to become more porous so oxygen can access the roots and water can drain more readily through the soil. Be careful not to stab surface roots with your tool!
Aerate around your trees once or twice a year, in the spring and/or fall, and always follow-up with mulch (find a great video on how to properly mulch HERE). For mature trees that are starting to show their age, it might be best to aerate the soil, mulch a large area around the base, and then try your best to walk over the roots as little as possible. Mature trees tend to be even more vulnerable to soil compaction.
Lastly – be aware that a healthy-looking tree is not an indication that your soil is fine! The negative impacts of soil compaction might not become visible in the canopy for (a number of growing seasons) many years. Be proactive and build aeration into your annual tree care routine.
Want more tips about keeping your trees healthy, or planning for the installation of new woody plants? Check out RI Tree Council’s other articles on tree care HERE, or sign up for the next Tree Stewards course!