
Author: John Campanini

Revitalize Your Trees: Discover the Power of Root Deep Care Today!”

by John Campanini, Technical Director, RI Tree

Urban trees often need fertilization. That’s mainly due to the unique characteristics of city soils.
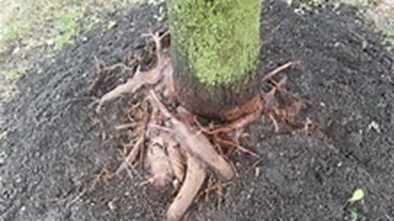
Signs that urban trees need fertilization include yellowing leaves (chlorosis), thinning canopies, short twigs, stunted growth, branch dieback, a weak response to mild drought, and early leaf drop.

These issues are often the result of improper soil pH levels, which can vary greatly depending on location, climate, and tree species. In other words, maintaining the correct soil pH is essential for helping trees flourish in urban environments.

New England soil is naturally acidic—pH level < 6.5. This level, which results from a mix of native soil, imported fill materials, construction debris, and different management practices like irrigation with high water or fertilizer use, is also highly variable.

One study comparing forest and urban soils found the average pH level of urban soils to be 7.6, compared to 5.5 for forest soils. Providing the right nutrients in the correct amounts is crucial for proper fertilization, which can be challenging and prone to errors.

Fertilizing Urban Trees Can Be Challenging
Proper tree fertilization begins with diagnosis and ends with application. The issue could be a soil with a low nutrient level, or the soil may need an amendment, like compost or peat moss/coir. A soil amendment is any material added to the soil to improve its physical properties, such as water retention, permeability, drainage, aeration, and structure.

Here are seven essential tips for fertilizing trees correctly:

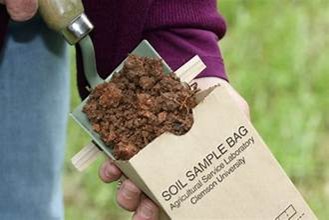
  1. Get a soil test first
    The most critical step is understanding what your soil actually needs. A soil test from a local agricultural extension office or lab will help identify any specific nutrient deficiencies (e.g., nitrogen, iron, manganese), determine the soil pH, which affects how well a tree can absorb available nutrients, and prevent you from applying unneeded nutrients (like phosphorus).
    (The University of Rhode Island will test soil for free. See this webpage for more information.)
  2. Choose the right fertilizer type
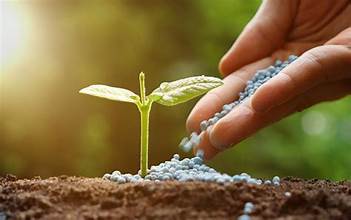
    Prioritize slow-release nitrogen (N) fertilizers. They feed the tree gradually over an extended period, minimizing “fertilizer burn” and excessive, weak shoot growth susceptible to pests and cold damage.
    Since nitrogen is often deficient in the soil and critical for foliage growth, opt for a fertilizer with a high nitrogen ratio (like a 3-1-2 or 4-1-1 N-P-K ratio), generally recommended for established trees.
  3. Fertilize the correct root zone
    A tree’s fine, water- and nutrient-absorbing roots extend far beyond the canopy (dripline). So spread fertilizer across the entire area under the tree’s canopy, extending to the dripline and even slightly beyond. Keep fertilizer a few inches away from the base of the trunk to prevent injury to the bark and root crown.
  4. Apply at the optimal time
    For ideal root health, fertilize in mid-spring – after the leaves have emerged and grown to full size. At this stage of development, the plant has used up most of its stored energy and will benefit the most from fertilizer laden with nutrients to help create more energy.
  5. Use the correct application method
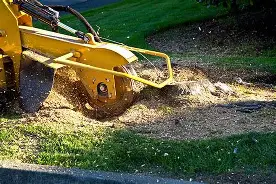
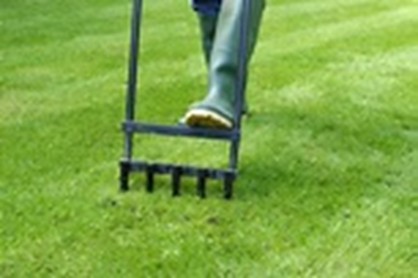
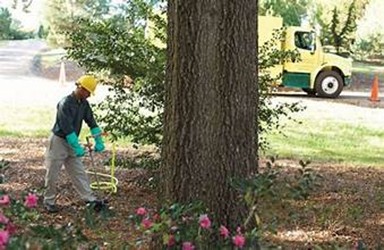
    Spread granular fertilizer evenly over the mulched area and water it thoroughly. Use an auger or punch bar to create 8–12-inch-deep holes, spaced 2–3 feet apart, throughout the target root zone.
    Distribute the granular fertilizer evenly among these holes to get the nutrients below the grass roots. Professional arborists often inject a liquid solution directly into the soil under pressure, which can also help aerate compacted soil.
  1. Apply the correct rate
    Over-fertilization can damage roots, create nutrient imbalances, and lead to weak, brittle growth. Always follow the rates specified in your soil test report. Use the correct type of fertilizer, at the proper rate, at the right time, and in the correct location.
    For surface applications, rates are usually based on a measure of “actual nitrogen per 1,000 square feet.” Calculate the pounds of your specific product needed according to its N-P-K ratio.
  2. Ensure adequate water and mulch
    Fertilizer isn’t a substitute for basic tree care; trees can’t absorb or transport fertilizer without water. So, water the area immediately after applying fertilizer to help dissolve the granules and move the nutrients into the root zone.
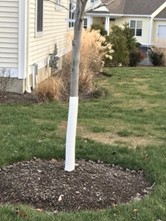
    Maintain a 2–4-inch layer of organic mulch (like wood chips) over the root zone, keeping it away from the trunk.
    Fertilizing trees in urban areas is often a necessity. Fertilization issues often come from the altered nature of urban soil and the lack of natural nutrient cycling, resulting in the need for fertilization. So, watch for the signs, like yellowing leaves or premature leaf drop, that tell you your trees may need help.
    Test your soil first, however, to pinpoint the issue. When fertilizing urban trees, defer to the rates specified in your soil test report. Applying the right kind of fertilizer, at the correct rate, at the right time, and in the right place will generate robust, healthy trees.
    Do you have fertilization questions? Contact the experts at RI Tree. They’ll guide you through fertilization, saving you time and money.

Protect Your Plants and Trees Today: Six Top Tips Against Sudden Frosts

Cellular destruction is the primary danger for plants and trees from a sudden frost. When temperatures drop rapidly below freezing (32°F or 0∘°C), the water inside and surrounding plant cells freezes, causing them to expand and rupture cell membranes.

Trees, on the other hand, experience structural and systemic damage from sudden frosts, which can cause frost cracking, bark splitting, root damage, and sap flow disruption. These create openings for pests and diseases.

Tips on Protecting Plants and Trees

The main goals here are to conserve energy and prevent lethal ice formation inside the plant’s cells. Here are seven tips on how to protect plants and trees:

  1. Cover plants with fabric: Drape old bed sheets, blankets, burlap, or commercial frost cloth loosely over plants and small trees. Use stakes or a frame to prevent the cover from crushing the foliage. Ensure the cover extends to the ground to trap the earth’s stored heat.
  2. Bring potted plants indoors: Move all container plants, especially tender annuals and tropicals, into a sheltered location like a garage, shed, covered porch, or indoors.
  1. Wrap young tree trunks: Young, thin-barked trees can be susceptible to frost damage. Wrap the trunks with a commercial tree wrap, burlap, or even cardboard to provide insulation.
  2. Water deeply before the freeze: Moist soil holds and re-radiates heat better than dry soil. Watering your plants thoroughly during the day before a frost is expected will help keep the root zone warmer overnight.
  3. Apply a thick layer of mulch: For in-ground plants and trees, apply a thick layer (about 3-6 inches) of straw, shredded leaves, or wood chips around the base. The mulch acts as an insulating blanket, helping to keep the soil and roots warm.
  4. Add a heat source (carefully): For very valuable or vulnerable plants, you can place a low-wattage heat source, like a strand of non-LED incandescent Christmas lights, under the cover to generate extra warmth. Always ensure the heat source is not touching the cover or foliage and does not pose a fire hazard.
    A sudden, unseasonal frost endangers plants and trees because it hits before they have had time to “harden off” for cold weather. The primary danger to plants and trees when this happens is cellular destruction due to the freezing and expansion of water. Implementing some or all of the six tips above boosts your plants and trees’ chances of surviving a sudden frost.
    For more information on protecting your plants and trees from sudden frosts, contact the experts at RI Tree.

Protect Your Plants and Trees Today: Six Top Tips Against Sudden Frosts

by John Campanini, Technical Director, RITree

The National Weather Service recently issued a freeze advisory for Rhode Island, indicating that temperatures drop as low as 29°F. Sudden, unseasonal frosts like this endanger plants and trees because they hit them before they have had time to prepare for cold weather. Cold acclimation or hardening is the key to plants and trees surviving the winter. The process is a fundamental, multi-step survival mechanism triggered by environmental signals and critical to a plant’s survival.

The primary danger for plants from a sudden frost is cellular destruction. When temperatures drop rapidly below freezing (32°F or 0∘°C), the water inside and surrounding plant cells freezes, causing them to expand and creating cell membrane rupture and dehydration. Trees, on the other hand, experience structural and systemic damage from rapid temperature decreases. That can cause frost cracking, bark splitting, root damage, and sap flow disruption, which create openings for pests and diseases.

Danger for Urban Trees

Sudden frosts tend to be more damaging to urban trees than those in natural or rural environments. A sudden frost can devastate new or tender growth in urban areas. Below, we break down two reasons why urban trees are more at risk from a sudden drop in temperatures than forest trees:

• Urban Heat Island (UHI) Effect and De-Acclimation

Cities are significantly warmer than surrounding rural areas due to pavement, buildings, and a lack of vegetation absorbing and radiating heat. This increase in temperatures is known as the urban heat island effect. This effect causes critical tree problems, like sunscalding and bark splitting, making city trees more susceptible to dehydration and worsening the damage caused by ice formation during a freeze. The effect is magnified for urban trees because they’re less hardy and prepared due to the artificial warmth and constant environmental stress.

• Compounding Urban Stresses
City trees already live under a perpetual state of stress, which severely limits their ability to recover from freeze damage. Urban trees often deal with compacted soil, a lack of nutrients, limited root space, and poor drainage, which weaken their overall health and resilience. Meanwhile, pavement and concrete limit water absorption, deicing salts used on sidewalks and roads damage tree roots and foliage, and cracked bark or dead branches open entry points for opportunistic pests and diseases.
Tips on Protecting Plants and Trees

The main goals of this process are to conserve energy and prevent lethal ice formation inside the plant’s cells. Here are seven tips on how to protect plants and trees:

  1. Cover plants with fabric: Drape old bed sheets, blankets, burlap, or commercial frost cloth loosely over plants and small trees. Use stakes or a frame to prevent the cover from crushing the foliage. Ensure the cover extends to the ground to trap the earth’s stored heat.
  2. Bring potted plants indoors: Move all container plants, especially tender annuals and tropicals, into a sheltered location like a garage, shed, covered porch, or indoors.
  1. Wrap young tree trunks: Young, thin-barked trees can be susceptible to frost damage. Wrap the trunks with a commercial tree wrap, burlap, or even cardboard to provide insulation.
  2. Water deeply before the freeze: Moist soil holds and re-radiates heat better than dry soil. Watering your plants thoroughly during the day before a frost is expected will help keep the root zone warmer overnight.
  3. Apply a thick layer of mulch: For in-ground plants and trees, apply a thick layer (about 3-6 inches) of straw, shredded leaves, or wood chips around the base. The mulch acts as an insulating blanket, helping to keep the soil and roots warm.
  4. Add a heat source (carefully): For very valuable or vulnerable plants, you can place a low-wattage heat source, like a strand of non-LED incandescent Christmas lights, under the cover to generate extra warmth. Always ensure the heat source is not touching the cover or foliage and does not pose a fire hazard.
    A sudden, unseasonal frost endangers plants and trees because it hits before they have had time to “harden off” for cold weather. The primary danger to plants and trees when this happens is cellular destruction due to the freezing and expansion of water.
    Urban trees are more susceptible to a sudden frost than forest trees thanks to the UHI effect and a combination of city stresses, like deicing salts, limited root space, and compacted soil. Implementing some or all of the six tips boosts your plants and trees’ chances of surviving a sudden frost.
    For more information on protecting your plants and trees from sudden frosts, contact the experts at RI Tree.

Reclaim Your Yard: Secrets to Removing Tree Stumps Cost-effectively

Do you have an ugly tree stump in your yard? Stumps are more than eyesores; they’re wooden remnants of a project that pose serious and costly hazards. They should be removed as quickly as possible. If you’re “stumped” by what to do with a stump, you’re not alone. Many landowners face the same issue. Removing tree stumps, however, is often more difficult than felling the tree. Picking the proper removal method is critical to reclaiming your landscape. 

Effective stump removal means choosing the correct removal method.  The choice of method depends on several critical factors: stump size and age, budget, time available, and comfort level with heavy equipment or chemicals. Fortunately, there are several critical benefits to removing a stump:

  • Eliminates a trip hazard if the stump is low
  • Allows for unhindered lawn mowing/maintenance
  • Clears planting space for trees, flowers, and garden beds
  • Prevents pest infestations/disease spread
  • Prevents the regrowth of the tree
  • Improves property look/value
  • Boosts curb appeal/home resale value
  • Stops damage caused by roots

Typical Cost for Removing a Stump

The cost for removing a stump varies in Rhode Island. Many professionals charge based on the stump’s diameter, measured at its widest point. The figures below are estimates. Your project’s cost may vary:

• Flat Rate Per Stump $150 to $600 per stump (This range covers small to large stumps).
• Per-Inch Grinding $3 to $5 per diameter inch (Plus a minimum service fee, often $100–$150)
For example, a 20-inch diameter stump priced at $4 per inch would cost around $80 (plus the minimum service fee), and a 40-inch diameter stump would cost around $160 (plus the minimum service fee).
Considerations when Choosing a Removal Method

Choosing a method for tree stump removal involves weighing several critical factors, including your:

  1. Time, budget, desired outcome, and
  2. Comfort level with the work.
  3. Immediate goal for the area.
  4. Plans for the spot where the stump is
  5. Size and type of stump

Hardwood trees (oaks and maples), for example, are dense and hard to dig out or rot chemically. Stump grinding might be the best method here.

Choosing a removal method also depends on your constraints. If time is limited, chemical decomposition and manual removal might not be suitable. Safety and location are also important. For example, stump grinding is the safest and most effective option if the stump is near a fence, foundation, or sidewalk. Additional constraints include removal and labor tolerance. Will you do the work yourself or hire a professional?
Methods for Removing a Method
The most effective method for removing a tree stump depends on your priorities, such as speed, completeness of removal, labor tolerance, and budget. Here are the most common methods, ranked generally by effectiveness and speed:

  1. Stump Grinding (Most Popular for Speed and Efficiency)
    Stump grinding is the most common and fastest method for residential stump removal. A specialized stump grinder uses a high-speed rotating cutter disk with sharp teeth to shred the stump into wood chips. The process continues until the stump is several inches to a foot below the soil line.
    Stump grinding is effective and efficient. But it doesn’t remove all the roots, leaves a pile of wood chips, and creates a hole that needs to be backfilled. Grinding may require renting a heavy, powerful, potentially dangerous machine (DIY) or hiring a professional.
  2. Manual Removal (Most Effective for Small Stumps)
    This method removes the entire stump and most of its primary roots. It involves digging around the stump to expose the roots, then using an axe, saw, or loppers to sever the exposed roots. Afterward, you can use a digging bar or a jack to pry the stump out once enough roots are severed, creating a clean area for new planting or construction. Labor-intensive and time-consuming, this method leaves a large hole to fill. It’s best suited for small stumps (less than 12 inches in diameter) or when you want to remove the entire root system.
  3. Chemical Decomposition (Least Labor, Most Time)
    This slow-acting method speeds up the natural decay process. It involves drilling deep holes into the top and sides of the stump. Then, a chemical—usually a high-nitrogen fertilizer like potassium nitrate, rock salt, or Epsom salt—is poured into the holes, which are watered. The stump is then covered to keep moisture, encouraging wood-rotting fungi and bacteria growth. This method requires minimal physical effort and is inexpensive. However, it’s risky (chemicals) and can take weeks to months to complete. Even after treatment, you may still need to remove the decayed wood and fill the hole manually.
    For more information on stump removal, contact our experts at RI Tree. They’ll help you choose the best removal method for your project.

Three Methods of Removing Tree Stumps

Do you have an ugly tree stump in your yard? Stumps are more than eyesores; they’re serious and potentially costly hazards and should be removed quickly.

But removing them is often more difficult than felling the tree. Picking the proper removal method is critical to eliminating the stump and reclaiming your landscape. 

Choosing a method for tree stump removal involves weighing several critical factors, including your:

  1. Time, budget, desired outcome, and
  2. Comfort level with the work.
  3. Immediate goal for the area.
  4. Plans for the spot where the stump is
  5. Size and type of stump

Hardwood trees (oaks and maples) are dense and hard to dig out or rot chemically. Stump grinding might be the best method here.

Methods for Removing a Stump
The most effective method for removing a tree stump depends on priorities like speed, completeness of removal, labor tolerance, and budget. Here are the most common removal methods, ranked generally by effectiveness and speed:
• Stump Grinding (most popular for speed and efficiency)
Stump grinding is the most common and fastest method for residential stump removal. A specialized stump grinder uses a high-speed rotating cutter disk with sharp teeth to shred the stump into wood chips. The process continues until the stump is several inches to a foot below the soil line. Stump grinding is effective and efficient. But it doesn’t remove all the roots, leaves a pile of wood chips, and creates a hole that needs to be backfilled.
• Manual Removal (Most effective for small stumps)
This method removes the entire stump and most of its primary roots. It involves digging around the stump to expose the roots, then using an axe, saw, or loppers to sever the exposed roots. Afterward, you can use a digging bar or a jack to pry the stump out once enough roots are severed, creating a clean area for new planting or construction. Labor-intensive and time-consuming, this method leaves a large hole to fill.
• Chemical Decomposition (least labor, most time)
This slow-acting method speeds up the natural decaying process. It involves drilling deep holes into the top and sides of the stump. Then, a chemical—usually a high-nitrogen fertilizer like potassium nitrate, rock salt, or Epsom salt—is poured into the holes, which are watered. The stump is then covered to keep moisture, encouraging wood-rotting fungi and bacteria growth.

For more information on stump removal, contact our experts at RI Tree. They’ll help you choose the best removal method for your project.

Transform Your Landscape: What Questions to Ask Before Planting Trees

by: John Campanini, Technical Director, RITree

Trees properly cared for in a nursery or garden center and given the proper care during transport are plantable almost anytime. Fall is an excellent time to plant trees, especially after leaf drop (between September 15 and November 1). Many nurseries and garden centers, in fact, hold end-of-season sales, so you can often find a wider variety of plants at a better price. So, you may get a shopping advantage.

Fall planting offers some significant advantages over spring planting. Soil and weather conditions, for example, allow trees to develop strong root systems before the ground freezes. Trees planted in the fall also experience less stress, fewer pests, and fewer diseases. Plus, they require less water. Fall generally has more consistent rainfall and cooler temperatures, which help keep soil moisture from evaporating too quickly.

Which is the Right Tree?

Selecting and planting a tree is an investment in your property’s future. But first, you must select the right tree for the given area and then plant it properly. Below is the seven-step guide to doing that: 

  1. Examine the soil

Planting a tree in healthy soil is critical. You want soil that is rich in nutrients and that retains moisture. Avoid areas with overly wet soil or poor drainage. Tilling the soil helps break up any hardpan beneath the surface. Soil texture is another important factor. You need soil with an appropriate pH level. Another key aspect is the soil’s fertility. Make sure it has the right balance of nutrients like nitrogen, phosphorus, and potassium.

You can send soil samples for testing to the Cooperative Extension, University of Rhode Island  for a detailed analysis. Tel: 401-874-2900.

  1. Analyze the existing conditions

The weather plays a key role in tree planting. Are there severe conditions that could hinder growth? Does the location receive full sun (6+ hours), partial sun (2-4 hours), or shade? What type of soil do you have? Is it sandy, loamy, or heavy clay? Does it drain properly, or does it retain standing water? Also, think about the tree’s mature size and canopy spread. Ensure there are no power lines above that could interfere with the tree as it grows, and avoid planting near buildings, sidewalks, or other structures. Additionally, consider the root system, which can spread as wide as the canopy.

  • Choose a suitable species 

Research trees that grow well in your area. Check your USDA Plant Hardiness Zone and find species suited for your climate. Native trees are usually the best choice since they are already adapted to local weather and pests. Avoid invasive tree species that could damage the ecosystem. Red maple, sugar maple, northern red oak, American beech, Eastern white pine, and eastern hemlock are good options for planting in New England.

  1. Purchase a healthy tree.

When you’re at the nursery, examine the tree carefully. Check the root ball if possible. Avoid balls with roots circling the container, as they can eventually “girdle” or strangle the tree. Make sure the trunk is straight and free of wounds, cankers, or insect damage. Examine the branches. They should be well-spaced and have a strong, wide angle of attachment to the trunk. The tree should also have a single, central leader (main stem).

  1. Dig the right-sized hole

This is a critical step. Dig the hole no deeper than the tree’s root ball and 2-3 timesas wide. Digging a shallow, wide hole encourages the roots to grow into the soil. Plant a little high to allow for settling. Leave the bottom undisturbed: You want it firm and undisturbed.

  1. Prepare the tree for planting

Gently remove the tree from its container or unwrap the burlap and wire cage if it’s a balled and burlapped tree. Locate the “root flare” where the trunk widens as it meets the roots. This flare should be at or slightly above the soil line when the tree is planted. Carefully loosen any circling roots. You may need to use your fingers or a knife to make a few shallow vertical cuts to encourage the roots to grow outwards.

7. Plant and mulch the tree

Place the tree in the center of the hole. Ensure it is straight from all angles. Backfill the hole with the same soil you removed. Don’t add soil amendments, compost, or fertilizer; this helps the tree adapt to the native soil. Gently firm the soil to remove air pockets. Avoid stomping or compacting it.

Finally, water the tree thoroughly to help the soil settle. Then, apply a 2–4-inch layer of organic mulch in a “donut” shape around the tree. Keep the mulch a few inches away from the trunk to prevent rot and pest issues. The mulch helps the tree retain moisture, regulate soil temperature, and prevent weeds.

The Rhode Island Tree Council teaches proper plant techniques in its Tree Stewards’ courses, given in the spring and fall. For more information, contact RITree at (401) 764-5885, or go to RITree’s website (www.ritree.org).

Revitalize Your Trees: Uncover Hidden Issues in Just Five Steps!

Fall is the perfect time for tree care. It’s great not only for planting saplings but also for checking your trees’ health. Adverse weather, like rainstorms, strong winds, and summer droughts, can weaken even the strongest trees. A tree’s ability to survive these harsh conditions depends on its health. Ignoring your tree’s health in the fall can be risky and may lead to failure, expensive repairs, and even personal injury.

Conducting a structural assessment of your trees in the fall can help you evaluate their health. As trees drop their leaves in the fall, their structure becomes more visible. Understanding the importance of fall tree assessment allows you to take proactive steps to ensure your trees’ safety and health. Plus, you can use the fall to prepare your trees for the upcoming New England winter and reduce the risk of tree failure.

Benefits of Structural Assessment

Trees may look strong and healthy from afar, but hidden flaws can weaken their structure. Finding and fixing these flaws is crucial for tree survival. Here are four benefits of doing a fall structural assessment now:

· Clearer visibility of defects

Without a dense canopy to obscure the view, you can see crucial hidden defects you wouldn’t have known about otherwise, such as weak branch unions, deadwood, and cracks and splits.

Post summer stress assessment
A fall assessment lets you see the cumulative effects of summer stress, such as signs of decline in trees. It also lets you identify pests and diseases, discolored leaves, or canopy thinning.
Preparation for winter storms
Identifying and fixing defects now reduces the risk of failure later on. You can also prune weak branches and install ‘structural support systems’ like cables and braces. These systems support weak or heavy branches, help trees withstand winter weather, and protect people and property.
Planning for long-term health
Fall assessments can help plan for a tree or trees’ long-term care. If you’ve hired an arborist in the summer, you can follow his or her advice and schedule work during the tree’s dormant period, which is best for the tree and the arborist.
A fall structural assessment can also identify the need for soil treatments, fertilization, or root care, helping trees start recovering early before the next growing season.
Five Steps in a Structural Assessment

A structural assessment of a tree is a detailed process of a systematic review of the tree and its surroundings. While a certified arborist is the best person for this task, a property owner can do a preliminary check by following these steps:


Step 1:

Initial walk-around and overall view
Start by walking around the tree to get an overall view. Look at the tree’s overall architecture and lean. Is the crown balanced, or is it heavy on one side? Does the tree lean? That can indicate a root problem.

Step 2:

Inspect the ground and root collar
The base of the tree is the most critical area for stability. Get down to the ground and inspect the root collar where the trunk meets the ground. Some exposed roots are normal, but many exposed or damaged roots can indicate a soil problem. Look for defects like fungal growth, girdling roots, compacted soil, and exposed roots.

Step 3:

Assess the trunk and main stem
The trunk is the tree’s main support structure. Inspect it closely for any signs of damage or weakness. Look for vertical cracks running up and down the trunk, note any hollow areas or cavities, and check for old wounds from lawnmowers, vehicles, or construction, which can be entry points for decay and disease.

Step 4:

Evaluate branch and canopy growth
Look for weak branch unions and dead, brittle, or broken branches, which are major hazards as they can fall anytime. A narrow V-shaped union is structurally weaker than a wide U-shaped one. Also, look for codominant stems, which often lack a strong connection and are prone to splitting. A sparse crown or early leaf yellowing can indicate a problem with the tree’s health and vitality.

Step 5:

Consider the target and site conditions
Finally, put the tree’s condition into the context. A defect might not be a major risk, but it can become one when combined with a nearby target, such as cars, houses, and play areas. Consider factors like wind exposure, soil type, and any recent changes to the area that could have damaged the root system.

If you find any defects or have concerns about the tree’s stability, call a certified arborist or RI Tree.

Revitalize Your Landscape: Discover the Hidden Benefits of Soil Aeration

Compacted soil can kill healthy trees. That’s right. Compacted soil can kill trees. It’s a silent killer. It might seem harmless if you see it, but this dense, suffocating environment deprives roots of three vital resources they need to thrive—oxygen, water, and nutrients. So, you need to address this problem as soon as you see it.

Compact soil is a common issue in urban and suburban landscapes. When soil becomes compacted, it harms the very foundation of a tree’s health. Soil aeration, a crucial practice for enhancing root health and boosting a tree’s longevity and vitality, can address this widespread problem.

Healthy soil features a balance of minerals, organic matter, water, and air. This porous structure allows for proper gas exchange, letting oxygen reach the roots and carbon dioxide escape. It also ensures that water can infiltrate the soil and be absorbed by tree roots instead of running off the surface.

Compaction transforms this process. It squeezes the air pockets and pore spaces needed for root function, leading to several harmful effects, including oxygen deprivation, nutrient and water shortages, and limited root growth. The Fall is a good time to aerate your soil. It promotes root growth and prepares a tree better for winter.

Aerating in the Fall is Optimal

Fall aeration coincides with the tree’s natural growth cycles, allowing it to recover and benefit most from the process. Like those found in Rhode Island, Fall is often considered the optimal time for cool-season grasses.

Here’s a more detailed breakdown of why Fall is ideal for aerating:

  • Promotes Root Growth: In the Fall, a tree’s energy shifts from producing leaves to developing its root system in preparation for winter. Aerating the soil like this lets roots grow into the newly created channels, creating a strong, resilient foundation.
  • Ideal Conditions: The cooler air temperatures and increased rainfall in the Fall reduce a tree’s stress and help the soil remain moist, essential for effective aeration. It’s much easier to work with moist but not waterlogged soil.
  • Winter Preparation: Fall aerating helps trees withstand winter’s freeze-thaw cycles by improving drainage and preventing water from pooling and freezing around the roots.

If you have heavy clay soil that tends to compact, you might need to aerate more often, perhaps once a year. For significant compaction or large, mature trees, consult a certified arborist or the experts at RI Tree.

Three Effective Methods for Aerating Soil

Aeration creates small holes or channels in the soil to mitigate compaction, restore the proper balance of air and water, and deliver nutrients. Several ways exist to achieve this aeration. They each have their own benefits.

1. Core Aeration

This method is a highly effective and widely used. A specialized machine or tool removes small plugs or “cores” of soil from the ground. The benefits of core aeration are profound:

  • Breaks up compaction: By removing soil, core aeration immediately creates channels that allow oxygen, water, and nutrients to penetrate deep into the root zone.
  • Improves gas exchange: The newly created air pockets facilitate the movement of gases, allowing roots to breathe and for harmful gases like carbon dioxide to escape.
  • Enhances water infiltration: Rain and irrigation water can move through the soil profile instead of just running off, ensuring that water reaches the roots where it is needed most.
  • Encourages deeper root growth: With the physical barrier removed, roots can extend further down into the soil, creating a stronger, more resilient root system that is less susceptible to drought.

Soil plugs left on the surface can decompose, returning valuable organic matter and nutrients to the soil.

2. Radial Trenching

Arborists use radial trenching for more severe cases of compaction or larger trees. First, you dig narrow trenches outward from the tree trunk, like spokes on a wheel. You then fill the trenches with a mixture of compost and loamy soil.

  • Direct access: Trenching provides a direct conduit for air and water to reach the roots, and the organic-rich soil mixture encourages new root growth within the trenches.
  • Addresses deeper compaction: Radial trenching can address compaction at greater depths than core aeration, making it ideal for severely distressed trees.

3. Vertical Mulching (VM)

Like radial trenching, VM involves drilling holes around the tree’s compacted soil in a grid pattern. The holes are then filled with compost, sand, and other organic matter. This method

  •  combines aeration and fertilization: It aerates the soil and directly delivers essential nutrients and organic matter to the root zone, improving soil structure.
  • Less intrusive: Vertical mulching can be less disruptive than radial trenching, making it suitable for areas where root damage needs to be minimized.

Apply a layer of organic mulch over the treated area after aeration. This method helps retain moisture, regulate soil temperature, and slowly add organic matter to the soil, supporting long-term health.

For a more comprehensive approach, contact a certified arborist or one of our experts at RI Tree. They can assess the tree’s needs and recommend a combination of aeration, fertilization, and other treatments needed in your situation.

Unleash Your Property’s Potential: Top 7 Secrets For Planting Saplings Successfully

Planting saplings can be challenging. Balled and burlapped (B&B) saplings differ from planting bare-root saplings. B&B saplings are dug up with a soil ball around their roots, which helps reduce transplant shock. Bare-root saplings have no soil around their roots, exposing them, but they are lighter and usually less expensive.
These planting secrets can significantly improve their survival rate and long-term growth of saplings:

  1. Soak or dip bare roots: Don’t just briefly dunk bare roots. After soaking them for a few hours (no more than 24), dip them in a “root dip” product or a slurry of native soil and water before planting.
  1. Create a “watering donut” or berm: Instead of just leveling the soil around the sapling, build a small circular berm (like a donut) of soil about 1-2 feet in diameter around the tree. This technique funnels water straight to the root zone and prevents runoff.
  2. Perform a “scratch test” on the root ball: Gently scratch the outer edge of the root ball. If you notice roots circling tightly around the perimeter, they are “girdling” and will eventually suffocate the tree. Untangling or pruning these roots promotes outward growth.
  3. Think about mycorrhizal fungi inoculation: Inoculating the planting hole with mycorrhizal fungi can greatly benefit saplings. These fungi create a symbiotic relationship with tree roots, significantly enhancing the tree’s ability to absorb water and nutrients from the soil.
  4. “Air pruning” for pot-bound roots (if applicable): If transplanting from a traditional plastic pot, gently rough up the outer roots or make a few vertical cuts with a clean blade to encourage outward growth and prevent the roots from circling in the ground.
  5. Conduct a “tilt test” to check planting depth: When placing the sapling in the hole, hold it upright and gently try to tilt it. If it feels stable and doesn’t easily fall over, the planting depth is correct. Make sure the root collar (where the roots meet the trunk) is at or slightly above ground level.
  6. Prioritize “structural pruning” early on (if needed): Strategic structural pruning can direct the sapling’s growth during the first year or two. Also, focus on removing competing leaders, crossing branches, or weak angles to promote a dominant central leader and a strong scaffold.
    For more on planting saplings, see our blog post here.

Transform Your Landscape or Garden: 7 Lesser-Known Tips

The right tree in the right spot elevates an ordinary patch of earth into a serene sanctuary, adding shade, beauty, and a tangible connection to your space. But incorporating trees into landscaping and garden design requires careful planning and ongoing maintenance to help transform your garden or landscape.

Below are seven lesser-known tips for adding trees to your space effectively.

  1. Embrace multi-stemmed and clumping forms: Instead of always choosing single-trunk trees, consider multi-stemmed or clumping varieties. These forms provide unique sculptural interest and a softer, more natural look. They also often allow better light filtration under their canopy, which supports more diverse underplanting.  
  2. Integrate trees with hardscaping: You could, for example, design a deck around an existing tree, create a custom bench encircling a trunk, or use permeable pavers around the root zone to allow for growth while providing a solid surface. This technique blurs the line between built and natural elements.
  3. Think “winter bones” and bark interest: Varieties with striking bark or compelling branch structures become living sculptures in the colder months, providing year-round appeal when other plants are dormant.
  4. Create “outdoor rooms” with tree canopies: Use the canopy of trees to define distinct outdoor “rooms.” A large shade tree can create a natural ceiling for an outdoor dining area, a quiet reading nook, a children’s play space, and a sense of intimacy and comfort that walls can’t replicate.
  5. Consider edible or productive trees: Beyond traditional ornamentals, integrate fruit, nut, or edible-berry trees. This adds a functional element, promotes local food production, and introduces a different seasonal interest. Espaliered fruit trees against a wall are a beautiful and space-saving example.

Finally, think beyond your immediate enjoyment when planting trees in your yard or garden. Choose healthy trees that mature beautifully and become a legacy for future owners.

For more help with planting trees in landscaping and garden design, see our blog post on the subject here.