
Author: John Campanini

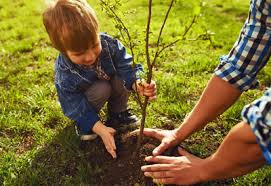
Protect Your Plants and Trees Today: Six Top Tips Against Sudden Frosts

by John Campanini, Technical Director, RITree

The National Weather Service recently issued a freeze advisory for Rhode Island, indicating that temperatures drop as low as 29°F. Sudden, unseasonal frosts like this endanger plants and trees because they hit them before they have had time to prepare for cold weather. Cold acclimation or hardening is the key to plants and trees surviving the winter. The process is a fundamental, multi-step survival mechanism triggered by environmental signals and critical to a plant’s survival.

The primary danger for plants from a sudden frost is cellular destruction. When temperatures drop rapidly below freezing (32°F or 0∘°C), the water inside and surrounding plant cells freezes, causing them to expand and creating cell membrane rupture and dehydration. Trees, on the other hand, experience structural and systemic damage from rapid temperature decreases. That can cause frost cracking, bark splitting, root damage, and sap flow disruption, which create openings for pests and diseases.

Danger for Urban Trees

Sudden frosts tend to be more damaging to urban trees than those in natural or rural environments. A sudden frost can devastate new or tender growth in urban areas. Below, we break down two reasons why urban trees are more at risk from a sudden drop in temperatures than forest trees:

• Urban Heat Island (UHI) Effect and De-Acclimation

Cities are significantly warmer than surrounding rural areas due to pavement, buildings, and a lack of vegetation absorbing and radiating heat. This increase in temperatures is known as the urban heat island effect. This effect causes critical tree problems, like sunscalding and bark splitting, making city trees more susceptible to dehydration and worsening the damage caused by ice formation during a freeze. The effect is magnified for urban trees because they’re less hardy and prepared due to the artificial warmth and constant environmental stress.

• Compounding Urban Stresses
City trees already live under a perpetual state of stress, which severely limits their ability to recover from freeze damage. Urban trees often deal with compacted soil, a lack of nutrients, limited root space, and poor drainage, which weaken their overall health and resilience. Meanwhile, pavement and concrete limit water absorption, deicing salts used on sidewalks and roads damage tree roots and foliage, and cracked bark or dead branches open entry points for opportunistic pests and diseases.
Tips on Protecting Plants and Trees

The main goals of this process are to conserve energy and prevent lethal ice formation inside the plant’s cells. Here are seven tips on how to protect plants and trees:

  1. Cover plants with fabric: Drape old bed sheets, blankets, burlap, or commercial frost cloth loosely over plants and small trees. Use stakes or a frame to prevent the cover from crushing the foliage. Ensure the cover extends to the ground to trap the earth’s stored heat.
  2. Bring potted plants indoors: Move all container plants, especially tender annuals and tropicals, into a sheltered location like a garage, shed, covered porch, or indoors.
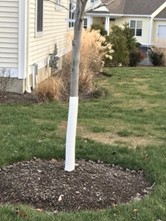
  1. Wrap young tree trunks: Young, thin-barked trees can be susceptible to frost damage. Wrap the trunks with a commercial tree wrap, burlap, or even cardboard to provide insulation.
  2. Water deeply before the freeze: Moist soil holds and re-radiates heat better than dry soil. Watering your plants thoroughly during the day before a frost is expected will help keep the root zone warmer overnight.
  3. Apply a thick layer of mulch: For in-ground plants and trees, apply a thick layer (about 3-6 inches) of straw, shredded leaves, or wood chips around the base. The mulch acts as an insulating blanket, helping to keep the soil and roots warm.
  4. Add a heat source (carefully): For very valuable or vulnerable plants, you can place a low-wattage heat source, like a strand of non-LED incandescent Christmas lights, under the cover to generate extra warmth. Always ensure the heat source is not touching the cover or foliage and does not pose a fire hazard.
    A sudden, unseasonal frost endangers plants and trees because it hits before they have had time to “harden off” for cold weather. The primary danger to plants and trees when this happens is cellular destruction due to the freezing and expansion of water.
    Urban trees are more susceptible to a sudden frost than forest trees thanks to the UHI effect and a combination of city stresses, like deicing salts, limited root space, and compacted soil. Implementing some or all of the six tips boosts your plants and trees’ chances of surviving a sudden frost.
    For more information on protecting your plants and trees from sudden frosts, contact the experts at RI Tree.

Reclaim Your Yard: Secrets to Removing Tree Stumps Cost-effectively

Do you have an ugly tree stump in your yard? Stumps are more than eyesores; they’re wooden remnants of a project that pose serious and costly hazards. They should be removed as quickly as possible. If you’re “stumped” by what to do with a stump, you’re not alone. Many landowners face the same issue. Removing tree stumps, however, is often more difficult than felling the tree. Picking the proper removal method is critical to reclaiming your landscape. 

Effective stump removal means choosing the correct removal method.  The choice of method depends on several critical factors: stump size and age, budget, time available, and comfort level with heavy equipment or chemicals. Fortunately, there are several critical benefits to removing a stump:

  • Eliminates a trip hazard if the stump is low
  • Allows for unhindered lawn mowing/maintenance
  • Clears planting space for trees, flowers, and garden beds
  • Prevents pest infestations/disease spread
  • Prevents the regrowth of the tree
  • Improves property look/value
  • Boosts curb appeal/home resale value
  • Stops damage caused by roots

Typical Cost for Removing a Stump

The cost for removing a stump varies in Rhode Island. Many professionals charge based on the stump’s diameter, measured at its widest point. The figures below are estimates. Your project’s cost may vary:

• Flat Rate Per Stump $150 to $600 per stump (This range covers small to large stumps).
• Per-Inch Grinding $3 to $5 per diameter inch (Plus a minimum service fee, often $100–$150)
For example, a 20-inch diameter stump priced at $4 per inch would cost around $80 (plus the minimum service fee), and a 40-inch diameter stump would cost around $160 (plus the minimum service fee).
Considerations when Choosing a Removal Method

Choosing a method for tree stump removal involves weighing several critical factors, including your:

  1. Time, budget, desired outcome, and
  2. Comfort level with the work.
  3. Immediate goal for the area.
  4. Plans for the spot where the stump is
  5. Size and type of stump

Hardwood trees (oaks and maples), for example, are dense and hard to dig out or rot chemically. Stump grinding might be the best method here.

Choosing a removal method also depends on your constraints. If time is limited, chemical decomposition and manual removal might not be suitable. Safety and location are also important. For example, stump grinding is the safest and most effective option if the stump is near a fence, foundation, or sidewalk. Additional constraints include removal and labor tolerance. Will you do the work yourself or hire a professional?
Methods for Removing a Method
The most effective method for removing a tree stump depends on your priorities, such as speed, completeness of removal, labor tolerance, and budget. Here are the most common methods, ranked generally by effectiveness and speed:

  1. Stump Grinding (Most Popular for Speed and Efficiency)
    Stump grinding is the most common and fastest method for residential stump removal. A specialized stump grinder uses a high-speed rotating cutter disk with sharp teeth to shred the stump into wood chips. The process continues until the stump is several inches to a foot below the soil line.
    Stump grinding is effective and efficient. But it doesn’t remove all the roots, leaves a pile of wood chips, and creates a hole that needs to be backfilled. Grinding may require renting a heavy, powerful, potentially dangerous machine (DIY) or hiring a professional.
  2. Manual Removal (Most Effective for Small Stumps)
    This method removes the entire stump and most of its primary roots. It involves digging around the stump to expose the roots, then using an axe, saw, or loppers to sever the exposed roots. Afterward, you can use a digging bar or a jack to pry the stump out once enough roots are severed, creating a clean area for new planting or construction. Labor-intensive and time-consuming, this method leaves a large hole to fill. It’s best suited for small stumps (less than 12 inches in diameter) or when you want to remove the entire root system.
  3. Chemical Decomposition (Least Labor, Most Time)
    This slow-acting method speeds up the natural decay process. It involves drilling deep holes into the top and sides of the stump. Then, a chemical—usually a high-nitrogen fertilizer like potassium nitrate, rock salt, or Epsom salt—is poured into the holes, which are watered. The stump is then covered to keep moisture, encouraging wood-rotting fungi and bacteria growth. This method requires minimal physical effort and is inexpensive. However, it’s risky (chemicals) and can take weeks to months to complete. Even after treatment, you may still need to remove the decayed wood and fill the hole manually.
    For more information on stump removal, contact our experts at RI Tree. They’ll help you choose the best removal method for your project.

Three Methods of Removing Tree Stumps

Do you have an ugly tree stump in your yard? Stumps are more than eyesores; they’re serious and potentially costly hazards and should be removed quickly.

But removing them is often more difficult than felling the tree. Picking the proper removal method is critical to eliminating the stump and reclaiming your landscape. 

Choosing a method for tree stump removal involves weighing several critical factors, including your:

  1. Time, budget, desired outcome, and
  2. Comfort level with the work.
  3. Immediate goal for the area.
  4. Plans for the spot where the stump is
  5. Size and type of stump

Hardwood trees (oaks and maples) are dense and hard to dig out or rot chemically. Stump grinding might be the best method here.

Methods for Removing a Stump
The most effective method for removing a tree stump depends on priorities like speed, completeness of removal, labor tolerance, and budget. Here are the most common removal methods, ranked generally by effectiveness and speed:
• Stump Grinding (most popular for speed and efficiency)
Stump grinding is the most common and fastest method for residential stump removal. A specialized stump grinder uses a high-speed rotating cutter disk with sharp teeth to shred the stump into wood chips. The process continues until the stump is several inches to a foot below the soil line. Stump grinding is effective and efficient. But it doesn’t remove all the roots, leaves a pile of wood chips, and creates a hole that needs to be backfilled.
• Manual Removal (Most effective for small stumps)
This method removes the entire stump and most of its primary roots. It involves digging around the stump to expose the roots, then using an axe, saw, or loppers to sever the exposed roots. Afterward, you can use a digging bar or a jack to pry the stump out once enough roots are severed, creating a clean area for new planting or construction. Labor-intensive and time-consuming, this method leaves a large hole to fill.
• Chemical Decomposition (least labor, most time)
This slow-acting method speeds up the natural decaying process. It involves drilling deep holes into the top and sides of the stump. Then, a chemical—usually a high-nitrogen fertilizer like potassium nitrate, rock salt, or Epsom salt—is poured into the holes, which are watered. The stump is then covered to keep moisture, encouraging wood-rotting fungi and bacteria growth.

For more information on stump removal, contact our experts at RI Tree. They’ll help you choose the best removal method for your project.

Transform Your Landscape: What Questions to Ask Before Planting Trees

by: John Campanini, Technical Director, RITree

Trees properly cared for in a nursery or garden center and given the proper care during transport are plantable almost anytime. Fall is an excellent time to plant trees, especially after leaf drop (between September 15 and November 1). Many nurseries and garden centers, in fact, hold end-of-season sales, so you can often find a wider variety of plants at a better price. So, you may get a shopping advantage.

Fall planting offers some significant advantages over spring planting. Soil and weather conditions, for example, allow trees to develop strong root systems before the ground freezes. Trees planted in the fall also experience less stress, fewer pests, and fewer diseases. Plus, they require less water. Fall generally has more consistent rainfall and cooler temperatures, which help keep soil moisture from evaporating too quickly.

Which is the Right Tree?

Selecting and planting a tree is an investment in your property’s future. But first, you must select the right tree for the given area and then plant it properly. Below is the seven-step guide to doing that: 

  1. Examine the soil

Planting a tree in healthy soil is critical. You want soil that is rich in nutrients and that retains moisture. Avoid areas with overly wet soil or poor drainage. Tilling the soil helps break up any hardpan beneath the surface. Soil texture is another important factor. You need soil with an appropriate pH level. Another key aspect is the soil’s fertility. Make sure it has the right balance of nutrients like nitrogen, phosphorus, and potassium.

You can send soil samples for testing to the Cooperative Extension, University of Rhode Island  for a detailed analysis. Tel: 401-874-2900.

  1. Analyze the existing conditions

The weather plays a key role in tree planting. Are there severe conditions that could hinder growth? Does the location receive full sun (6+ hours), partial sun (2-4 hours), or shade? What type of soil do you have? Is it sandy, loamy, or heavy clay? Does it drain properly, or does it retain standing water? Also, think about the tree’s mature size and canopy spread. Ensure there are no power lines above that could interfere with the tree as it grows, and avoid planting near buildings, sidewalks, or other structures. Additionally, consider the root system, which can spread as wide as the canopy.

  • Choose a suitable species 

Research trees that grow well in your area. Check your USDA Plant Hardiness Zone and find species suited for your climate. Native trees are usually the best choice since they are already adapted to local weather and pests. Avoid invasive tree species that could damage the ecosystem. Red maple, sugar maple, northern red oak, American beech, Eastern white pine, and eastern hemlock are good options for planting in New England.

  1. Purchase a healthy tree.

When you’re at the nursery, examine the tree carefully. Check the root ball if possible. Avoid balls with roots circling the container, as they can eventually “girdle” or strangle the tree. Make sure the trunk is straight and free of wounds, cankers, or insect damage. Examine the branches. They should be well-spaced and have a strong, wide angle of attachment to the trunk. The tree should also have a single, central leader (main stem).

  1. Dig the right-sized hole

This is a critical step. Dig the hole no deeper than the tree’s root ball and 2-3 timesas wide. Digging a shallow, wide hole encourages the roots to grow into the soil. Plant a little high to allow for settling. Leave the bottom undisturbed: You want it firm and undisturbed.

  1. Prepare the tree for planting

Gently remove the tree from its container or unwrap the burlap and wire cage if it’s a balled and burlapped tree. Locate the “root flare” where the trunk widens as it meets the roots. This flare should be at or slightly above the soil line when the tree is planted. Carefully loosen any circling roots. You may need to use your fingers or a knife to make a few shallow vertical cuts to encourage the roots to grow outwards.

7. Plant and mulch the tree

Place the tree in the center of the hole. Ensure it is straight from all angles. Backfill the hole with the same soil you removed. Don’t add soil amendments, compost, or fertilizer; this helps the tree adapt to the native soil. Gently firm the soil to remove air pockets. Avoid stomping or compacting it.

Finally, water the tree thoroughly to help the soil settle. Then, apply a 2–4-inch layer of organic mulch in a “donut” shape around the tree. Keep the mulch a few inches away from the trunk to prevent rot and pest issues. The mulch helps the tree retain moisture, regulate soil temperature, and prevent weeds.

The Rhode Island Tree Council teaches proper plant techniques in its Tree Stewards’ courses, given in the spring and fall. For more information, contact RITree at (401) 764-5885, or go to RITree’s website (www.ritree.org).

Revitalize Your Trees: Uncover Hidden Issues in Just Five Steps!

Fall is the perfect time for tree care. It’s great not only for planting saplings but also for checking your trees’ health. Adverse weather, like rainstorms, strong winds, and summer droughts, can weaken even the strongest trees. A tree’s ability to survive these harsh conditions depends on its health. Ignoring your tree’s health in the fall can be risky and may lead to failure, expensive repairs, and even personal injury.

Conducting a structural assessment of your trees in the fall can help you evaluate their health. As trees drop their leaves in the fall, their structure becomes more visible. Understanding the importance of fall tree assessment allows you to take proactive steps to ensure your trees’ safety and health. Plus, you can use the fall to prepare your trees for the upcoming New England winter and reduce the risk of tree failure.

Benefits of Structural Assessment

Trees may look strong and healthy from afar, but hidden flaws can weaken their structure. Finding and fixing these flaws is crucial for tree survival. Here are four benefits of doing a fall structural assessment now:

· Clearer visibility of defects

Without a dense canopy to obscure the view, you can see crucial hidden defects you wouldn’t have known about otherwise, such as weak branch unions, deadwood, and cracks and splits.

Post summer stress assessment
A fall assessment lets you see the cumulative effects of summer stress, such as signs of decline in trees. It also lets you identify pests and diseases, discolored leaves, or canopy thinning.
Preparation for winter storms
Identifying and fixing defects now reduces the risk of failure later on. You can also prune weak branches and install ‘structural support systems’ like cables and braces. These systems support weak or heavy branches, help trees withstand winter weather, and protect people and property.
Planning for long-term health
Fall assessments can help plan for a tree or trees’ long-term care. If you’ve hired an arborist in the summer, you can follow his or her advice and schedule work during the tree’s dormant period, which is best for the tree and the arborist.
A fall structural assessment can also identify the need for soil treatments, fertilization, or root care, helping trees start recovering early before the next growing season.
Five Steps in a Structural Assessment

A structural assessment of a tree is a detailed process of a systematic review of the tree and its surroundings. While a certified arborist is the best person for this task, a property owner can do a preliminary check by following these steps:


Step 1:

Initial walk-around and overall view
Start by walking around the tree to get an overall view. Look at the tree’s overall architecture and lean. Is the crown balanced, or is it heavy on one side? Does the tree lean? That can indicate a root problem.

Step 2:

Inspect the ground and root collar
The base of the tree is the most critical area for stability. Get down to the ground and inspect the root collar where the trunk meets the ground. Some exposed roots are normal, but many exposed or damaged roots can indicate a soil problem. Look for defects like fungal growth, girdling roots, compacted soil, and exposed roots.

Step 3:

Assess the trunk and main stem
The trunk is the tree’s main support structure. Inspect it closely for any signs of damage or weakness. Look for vertical cracks running up and down the trunk, note any hollow areas or cavities, and check for old wounds from lawnmowers, vehicles, or construction, which can be entry points for decay and disease.

Step 4:

Evaluate branch and canopy growth
Look for weak branch unions and dead, brittle, or broken branches, which are major hazards as they can fall anytime. A narrow V-shaped union is structurally weaker than a wide U-shaped one. Also, look for codominant stems, which often lack a strong connection and are prone to splitting. A sparse crown or early leaf yellowing can indicate a problem with the tree’s health and vitality.

Step 5:

Consider the target and site conditions
Finally, put the tree’s condition into the context. A defect might not be a major risk, but it can become one when combined with a nearby target, such as cars, houses, and play areas. Consider factors like wind exposure, soil type, and any recent changes to the area that could have damaged the root system.

If you find any defects or have concerns about the tree’s stability, call a certified arborist or RI Tree.

Revitalize Your Landscape: Discover the Hidden Benefits of Soil Aeration

Compacted soil can kill healthy trees. That’s right. Compacted soil can kill trees. It’s a silent killer. It might seem harmless if you see it, but this dense, suffocating environment deprives roots of three vital resources they need to thrive—oxygen, water, and nutrients. So, you need to address this problem as soon as you see it.

Compact soil is a common issue in urban and suburban landscapes. When soil becomes compacted, it harms the very foundation of a tree’s health. Soil aeration, a crucial practice for enhancing root health and boosting a tree’s longevity and vitality, can address this widespread problem.

Healthy soil features a balance of minerals, organic matter, water, and air. This porous structure allows for proper gas exchange, letting oxygen reach the roots and carbon dioxide escape. It also ensures that water can infiltrate the soil and be absorbed by tree roots instead of running off the surface.

Compaction transforms this process. It squeezes the air pockets and pore spaces needed for root function, leading to several harmful effects, including oxygen deprivation, nutrient and water shortages, and limited root growth. The Fall is a good time to aerate your soil. It promotes root growth and prepares a tree better for winter.

Aerating in the Fall is Optimal

Fall aeration coincides with the tree’s natural growth cycles, allowing it to recover and benefit most from the process. Like those found in Rhode Island, Fall is often considered the optimal time for cool-season grasses.

Here’s a more detailed breakdown of why Fall is ideal for aerating:

  • Promotes Root Growth: In the Fall, a tree’s energy shifts from producing leaves to developing its root system in preparation for winter. Aerating the soil like this lets roots grow into the newly created channels, creating a strong, resilient foundation.
  • Ideal Conditions: The cooler air temperatures and increased rainfall in the Fall reduce a tree’s stress and help the soil remain moist, essential for effective aeration. It’s much easier to work with moist but not waterlogged soil.
  • Winter Preparation: Fall aerating helps trees withstand winter’s freeze-thaw cycles by improving drainage and preventing water from pooling and freezing around the roots.

If you have heavy clay soil that tends to compact, you might need to aerate more often, perhaps once a year. For significant compaction or large, mature trees, consult a certified arborist or the experts at RI Tree.

Three Effective Methods for Aerating Soil

Aeration creates small holes or channels in the soil to mitigate compaction, restore the proper balance of air and water, and deliver nutrients. Several ways exist to achieve this aeration. They each have their own benefits.

1. Core Aeration

This method is a highly effective and widely used. A specialized machine or tool removes small plugs or “cores” of soil from the ground. The benefits of core aeration are profound:

  • Breaks up compaction: By removing soil, core aeration immediately creates channels that allow oxygen, water, and nutrients to penetrate deep into the root zone.
  • Improves gas exchange: The newly created air pockets facilitate the movement of gases, allowing roots to breathe and for harmful gases like carbon dioxide to escape.
  • Enhances water infiltration: Rain and irrigation water can move through the soil profile instead of just running off, ensuring that water reaches the roots where it is needed most.
  • Encourages deeper root growth: With the physical barrier removed, roots can extend further down into the soil, creating a stronger, more resilient root system that is less susceptible to drought.

Soil plugs left on the surface can decompose, returning valuable organic matter and nutrients to the soil.

2. Radial Trenching

Arborists use radial trenching for more severe cases of compaction or larger trees. First, you dig narrow trenches outward from the tree trunk, like spokes on a wheel. You then fill the trenches with a mixture of compost and loamy soil.

  • Direct access: Trenching provides a direct conduit for air and water to reach the roots, and the organic-rich soil mixture encourages new root growth within the trenches.
  • Addresses deeper compaction: Radial trenching can address compaction at greater depths than core aeration, making it ideal for severely distressed trees.

3. Vertical Mulching (VM)

Like radial trenching, VM involves drilling holes around the tree’s compacted soil in a grid pattern. The holes are then filled with compost, sand, and other organic matter. This method

  •  combines aeration and fertilization: It aerates the soil and directly delivers essential nutrients and organic matter to the root zone, improving soil structure.
  • Less intrusive: Vertical mulching can be less disruptive than radial trenching, making it suitable for areas where root damage needs to be minimized.

Apply a layer of organic mulch over the treated area after aeration. This method helps retain moisture, regulate soil temperature, and slowly add organic matter to the soil, supporting long-term health.

For a more comprehensive approach, contact a certified arborist or one of our experts at RI Tree. They can assess the tree’s needs and recommend a combination of aeration, fertilization, and other treatments needed in your situation.

Unleash Your Property’s Potential: Top 7 Secrets For Planting Saplings Successfully

Planting saplings can be challenging. Balled and burlapped (B&B) saplings differ from planting bare-root saplings. B&B saplings are dug up with a soil ball around their roots, which helps reduce transplant shock. Bare-root saplings have no soil around their roots, exposing them, but they are lighter and usually less expensive.
These planting secrets can significantly improve their survival rate and long-term growth of saplings:

  1. Soak or dip bare roots: Don’t just briefly dunk bare roots. After soaking them for a few hours (no more than 24), dip them in a “root dip” product or a slurry of native soil and water before planting.
  1. Create a “watering donut” or berm: Instead of just leveling the soil around the sapling, build a small circular berm (like a donut) of soil about 1-2 feet in diameter around the tree. This technique funnels water straight to the root zone and prevents runoff.
  2. Perform a “scratch test” on the root ball: Gently scratch the outer edge of the root ball. If you notice roots circling tightly around the perimeter, they are “girdling” and will eventually suffocate the tree. Untangling or pruning these roots promotes outward growth.
  3. Think about mycorrhizal fungi inoculation: Inoculating the planting hole with mycorrhizal fungi can greatly benefit saplings. These fungi create a symbiotic relationship with tree roots, significantly enhancing the tree’s ability to absorb water and nutrients from the soil.
  4. “Air pruning” for pot-bound roots (if applicable): If transplanting from a traditional plastic pot, gently rough up the outer roots or make a few vertical cuts with a clean blade to encourage outward growth and prevent the roots from circling in the ground.
  5. Conduct a “tilt test” to check planting depth: When placing the sapling in the hole, hold it upright and gently try to tilt it. If it feels stable and doesn’t easily fall over, the planting depth is correct. Make sure the root collar (where the roots meet the trunk) is at or slightly above ground level.
  6. Prioritize “structural pruning” early on (if needed): Strategic structural pruning can direct the sapling’s growth during the first year or two. Also, focus on removing competing leaders, crossing branches, or weak angles to promote a dominant central leader and a strong scaffold.
    For more on planting saplings, see our blog post here.

Transform Your Landscape or Garden: 7 Lesser-Known Tips

The right tree in the right spot elevates an ordinary patch of earth into a serene sanctuary, adding shade, beauty, and a tangible connection to your space. But incorporating trees into landscaping and garden design requires careful planning and ongoing maintenance to help transform your garden or landscape.

Below are seven lesser-known tips for adding trees to your space effectively.

  1. Embrace multi-stemmed and clumping forms: Instead of always choosing single-trunk trees, consider multi-stemmed or clumping varieties. These forms provide unique sculptural interest and a softer, more natural look. They also often allow better light filtration under their canopy, which supports more diverse underplanting.  
  2. Integrate trees with hardscaping: You could, for example, design a deck around an existing tree, create a custom bench encircling a trunk, or use permeable pavers around the root zone to allow for growth while providing a solid surface. This technique blurs the line between built and natural elements.
  3. Think “winter bones” and bark interest: Varieties with striking bark or compelling branch structures become living sculptures in the colder months, providing year-round appeal when other plants are dormant.
  4. Create “outdoor rooms” with tree canopies: Use the canopy of trees to define distinct outdoor “rooms.” A large shade tree can create a natural ceiling for an outdoor dining area, a quiet reading nook, a children’s play space, and a sense of intimacy and comfort that walls can’t replicate.
  5. Consider edible or productive trees: Beyond traditional ornamentals, integrate fruit, nut, or edible-berry trees. This adds a functional element, promotes local food production, and introduces a different seasonal interest. Espaliered fruit trees against a wall are a beautiful and space-saving example.

Finally, think beyond your immediate enjoyment when planting trees in your yard or garden. Choose healthy trees that mature beautifully and become a legacy for future owners.

For more help with planting trees in landscaping and garden design, see our blog post on the subject here.

Using Trees to Transform Your Landscape or Garden: 7 Lesser-Known Tips

Trees are more than just a backdrop in landscaping and garden design. Common in landscaping and garden design, trees often serve as the core of a well-planned landscape or garden design. The right tree in the right location can elevate an ordinary patch of earth into a serene sanctuary, adding shade, beauty, and a tangible connection to your space. But incorporating trees into landscaping and garden design requires careful planning and ongoing maintenance to help transform your garden or landscape.

Trees offer numerous benefits in landscaping and garden design. Trees add structure, shape, and vertical interest, acting as focal points, framing views, and defining spaces. Their various shapes (columnar, weeping, spreading), textures, and colors (foliage, bark, flowers, fruits) boost visual appeal and beauty throughout all seasons. Common advantages include temperature regulation and shade, improved air quality, soil stabilization and erosion control, privacy and screening, noise reduction, and increased property values.

Key Considerations when Adding Trees

Trees are extremely popular in landscaping and garden design, making it hard to envision an outdoor space without at least one. They are often highly recommended in various settings, such as residential yards, commercial and public areas, sustainability efforts, green infrastructure, microclimate regulation, and architectural planning.

Here are some key considerations when using trees to transform a space:

• Mature size and space constraints (root damage, canopy interference, and overcrowding)
• Right tree, right place (site suitability)
• Maintenance requirements (pruning, pest/disease management, watering, leaf/debris management)
• Cost/time investment (initial cost, long-term costs, maintenance costs)
• Impact on existing landscape elements (shade creation, root competition, water uptake)
• Potential for damage and safety concerns (falling branches, uplifted landscapes, allergies)
• Invasive tree species
• Debris disposal
These considerations are critical. However, even the most seasoned landscapers can overlook subtle yet impactful ways to integrate trees into their designs.
Below are seven lesser-known tips for adding trees into your space effectively.

  1. Embrace multi-stemmed and clumping forms: Instead of always choosing single-trunk trees, consider multi-stemmed or clumping varieties, such as certain birches, serviceberries, or larger shrubs trained as small trees. These forms provide unique sculptural interest and a softer, more natural look, and often allow better light filtration under their canopy, which supports more diverse underplanting. They can also add visual weight in a smaller space.
  2. Integrate trees with hardscaping: Instead of just planting trees near patios, decks, or walkways, actively integrate them into the hardscape. You could, for example, design a deck around an existing tree, create a custom bench encircling a trunk, or use permeable pavers around the root zone to allow for growth while providing a solid surface. This technique blurs the line between built and natural elements.
  1. Think “winter bones” and bark interest: While flowers and fall foliage get the most attention, consider the tree’s form and bark in winter. Varieties with striking bark (e.g., Paperbark Maple, River Birch, Sycamore, various dogwoods) or compelling branch structures (e.g., Japanese Maples, Contorted Filbert) become living sculptures in the colder months, providing year-round appeal when other plants are dormant.
  2. Create “outdoor rooms” with tree canopies: Use the canopy of trees to define distinct outdoor “rooms.” A large shade tree can create a natural ceiling for an outdoor dining area, a quiet reading nook, or a children’s play space. The feeling of enclosure and dappled light under a tree can evoke a sense of intimacy and comfort that walls cannot replicate.
  3. Consider edible or productive trees: Beyond traditional ornamentals, integrate fruit, nut, or edible-berry trees. This adds a functional element, promotes local food production, and introduces a different seasonal interest. Espaliered fruit trees against a wall are a beautiful and space-saving example.
    Finally, when planting trees in your landscaping and garden, plant for succession and future generations, think beyond your immediate enjoyment. The key is choosing a healthy tree or trees that mature beautifully and become a legacy for future owners.
    This approach involves thinking about their ultimate size and growth habit over decades, not just years, and choosing species well-suited to the climate and soil for long-term health. Planting a diverse mix also helps ensure continuity if one species is lost to disease or pests.
    For more help with planting trees in landscaping and garden design, call the experts at RI Tree at 401-764-5885 or email us at RITree.

Defend Your Trees: Master this Seven-Step Guide to Spotted Lanternfly Removal

The spotted lanternfly (Lycorma delicatula) is highly invasive. It feeds on plant sap and excretes a sugary substance called “honeydew,” which promotes sooty mold growth on plants, reduces photosynthesis, and weakens the plants. Spotted lanternflies don’t fly; they hitch rides on buses, cars, and other objects, which helps their spread. While they don’t hurt humans, they seriously threaten agriculture, including crops, trees, orchards, and vineyards. A recent study in Pennsylvania estimates that crop losses from this pest amount to about $50 million yearly.  

Spotted lanternflies are mainly found in the north-central part of Rhode Island, but that’s changing. Evidence shows these pests are spreading throughout the entire state. Currently, RI DEM is focused on new infestations in the state, such as the recent discovery in Barrington. RI DEM is also working to limit the spread of lanternflies in the state’s agricultural areas, where these sap-sucking pests can damage crops. While RI DEM works hard to control this pest, homeowners can play a crucial role in slowing their spread.

Here are seven steps you can take to help:

1. Destroy egg masses

Destroying the spotted lanternfly’s eggs is among the most effective ways to stop its spread. The females lay their eggs in clusters that look like light gray or brownish mud patches on nearly any hard surface, including trees, rocks, outdoor furniture, vehicles, and fences. The egg-laying season runs from September to December, with eggs hatching in late spring. So, inspect your trees regularly to look for these masses. Then scrape them into a container filled with rubbing alcohol or hand sanitizer to ensure the eggs are killed. 

2. Use sticky bands on trees (with caution)

Another effective way to stop these pests from spreading is to put sticky bands around tree trunks. The sticky surface traps newborns from climbing the tree and reaching the upper canopy. However, use sticky bands carefully. They can also trap and harm other beneficial insects, birds, and small animals. So, use a narrower band, or more importantly, create a guard around the sticky surface using something like chicken wire or window screening to trap the lanternfly newborns. Check the bands regularly for bycatch and replace them as they become full.

3. Remove “Tree-of-Heaven”

The “tree-of-heaven” (Ailanthus altissima) is the primary host of the Spotted Lanternfly. While the lanternfly feeds on over 100 plant species, it thrives when this tree is present. Removing it from your property is an effective long-term management strategy. But simply cutting the tree down isn’t enough. The stump can re-sprout and grow stronger. Instead, use the “hack-and-squirt” technique to kill the tree. It applies a targeted herbicide directly to the tree’s vascular system. When done right, this technique kills the tree completely.

The important life stages of the Spotted Lanternfly: eggs, wingless nymphs and the adult with wings for flight.

5. Check vehicles and outdoor equipment

Spotted lanternflies are excellent “hitchhikers.” They do not travel great distances on their own, but they are very adept at latching onto vehicles and other objects. Inspect your vehicle or any outdoor things you take before traveling, especially if you live in or are leaving a known infested area. If you are moving firewood, outdoor furniture, grills, or any other equipment, thoroughly inspect both adult lanternflies and their egg masses. By taking a few moments to check for hitchhikers, you can prevent the unintentional spread of this invasive pest to new areas.

6. Use insecticides responsibly

Insecticides may be necessary if there’s a sudden infestation. You have several options for insecticides, including contact sprays and systemic treatments. Sprays kill insects on contact and can help effectively manage visible populations. Use insecticides responsibly and follow all label instructions. Systematic treatments to a specific tree or area are best applied by a professional. Consider the environmental impact and potential harm to non-target species before applying any chemical treatment. 

7. Stay informed and report sightings

The fight against the spotted lanternfly is ongoing, and the best practices for management are constantly being refined. It’s critical to stay informed about the latest recommendations from your state’s agricultural extension office or department of agriculture. These resources provide up-to-date information on identification, management, and the current boundaries of the quarantine zones. You can always check the RI Tree for the latest news on the lanternflies or this RI DEM  website.